1. HAVE A LIGHTROOM MOBILE ON YOUR PHONE
If it is not, then you can download it Lightroom Mobile CC using the following links.
It's completely free and all important features of the app do not require any subscriptions.
2. SELECT A PRESET AND DOWNLOAD IT
Open the page of any of the presets and click the "Download" button. After you click the "Download" button, the download will start.
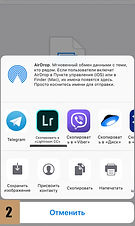
For iOS, a special page will open where you will need to click "Open in Lightroom" or select Lightroom via the "More" button.
Android users can simply download the file.


3. OPEN THE PRESET AND COPY THE SETTINGS
If you are an Android user and the picture has not yet appeared in the application, add it from the files.
If you have already opened a preset file (this is a picture with settings), then click on the button with 3 dots in the upper right corner.
Click "Copy Settings" and select all the settings (or just the ones you want if you are an advanced user). And click "OK".


4. INSERT SETTINGS TO PHOTO
Open the photo to which you want to add the preset settings (you need to add it using the special blue plus button), click on the 3 dots in the upper right corner.
Select "Paste Settings".
Hooray, you are great! The settings have been added, and your photo has been transformed!
To save it - click on the special icon next to the cloud icon.

